To recap, I originally ordered a replacement from Larini, but unfortunately it didn't fit so I sent it back and Larini gave me a full refund... so hats off to them for customer service.
Instead, I ordered the Maserati OEM de-cat front section, made by the factory for cars sold to Saudi Arabia. I'd heard on the Maserati Bi-turbo forum (thoroughly recommended by the way... it's a very active forum) that this OEM part is made from stainless steel, although not particularly well finished. However, it's considerably cheaper than the 3rd party replacements available on the market, so I figured what the hell and ordered one.

As you can see, the design of the OEM replacement is very simple and what I'd expect for a straight through design... just straight piping in place of the cats. Not only is this cheaper to manufacture, but it also helps minimise exhaust back pressure, since every bend results in a pressure drop. Also, the OEM replacement is made from a larger diameter tubing... it appears to be 50 mm in diameter versus about 40 mm for the original tubing and the rear section that I have fitted. Again, this is good for minimising back pressure.
Finishing of the OEM replacement indeed isn't great. Where this is particularly noticeable is in the fitting of the small diameter cross flow pipes that joint the left and right side pipes to maintain equal (positive) pressure on both sides.

The picture above shows the inside of the piping and you can see on the left hand pipe there's a considerable sized "burr" sticking out into the inside of the pipe. Essentially, the factory never took the time to clean up after welding in the small pipe. It's not a major thing though.
So, everything was looking OK until the replacement section was positioned against a similar part to that which it was replacing... it was about 7 cm longer! It turns out that when the ABS variant of the Ghibli was introduced in 1994, Maserati decided to lengthen this front section exhaust. This is reflected in the part numbers, where the part numbers for this section subtly change. But the strange thing is, the rear sections didn't seem to change, so I can only assume that the rear section remains the same length for all variants of Ghibli. Therefore, the additional length of the front section must be taken up in the bends of the rear section on the post ABS variant cars.
This explains quite a few things, in particular why the Larini part didn't fit. It now seems obvious that there part had been modelled on a post ABS variant Ghibli and therefore should fit these cars no problem at all.
However, this realisation didn't help me!

Fortunately, Jorrit at Auto Forza who was fitting the exhaust for me discovered that there's a steel workshop not far from his workshop that specialises in forming stainless steel, particularly stainless steel tubing... a lucky break! What they did to shorten the exhaust was to cut it and then enlarge one end of the cut with a mandrel which fits inside the pipe and expands it from the inside. Sufficient length of pipe was expanded such that the other cut end could be inserted inside the expanded end, such that they overlapped by the required shortening length. You can make this out in the picture above.
The nice thing about this technique is that it keeps the inside of the pipe flush and smooth, since the weld of the pipes is made against the outside of internal pipe, which is good for gas flow.
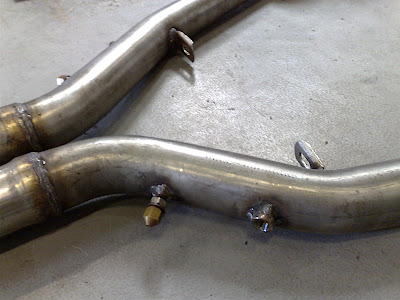
The next problem was that this exhaust replacement was meant for a post ABS variant Ghibli and therefore came equipped with two lambda ports, one on each pipe. However, my car is equipped with a single lambda probe and on the original exhaust this is mounted on the front cross flow pipe in front of the cats, as you can see in the picture below.

I could just have installed the probe on one side with the assumption that both banks run about the the same, but I had another driver, since I'm looking to install a wideband lambda so I therefore want to measure average values from both banks.

The solution to this was to drill a hole in the cross flow pipe and weld in a nut with the appropriate thread for the new sensor. This turned out to be easier said than done, since we didn't have the right sized nut to had to make one, plus the diameter of the cross flow pipe is quite small, so the face that was being welded onto it had to be profiled.

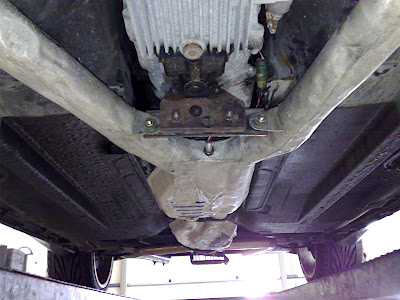
However, the end result turned out fine. We made sure that there was sufficient space to install the probe (get at it with a spanner). It looks like it sticks up a lot in the picture above, but it fits under the car fine without touching the underside, as you can see in the picture below.

Next, I wanted to install an Exhaust Gas Temperature sensor onto the replacement exhaust. This needs to be placed as close as possible to the outlet of the turbo. Unfortunately, I only have one sensor, but it turns out that installing one on the drivers side pipe would be tricky since there's not much space. So we decided to install it on the passenger side.

As you can see from the picture above, we drilled another hole and welded on a nut with the appropriate thread pretty close to the flange connection that joins the exhaust to the turbo outlet manifold. The picture below shows that the location turned out to be spot on, with sufficient space for the sensor and to run the stiff cable into the cabin.

When it came to fitting the replacement section, we realised again that the mounting lugs didn't align with the mounting bracket that is attached to the gearbox housing. The picture below shows the OEM exhaust, but it seems when Maserati changed the design of the front section they also increased the distance between the two pipes around the gearbox. As a result, I've had to order a new mounting bracket to attach the replacement section to the gearbox housing. Fortunately, it's quite cheap!
Once the replacement front section was installed, the rear section needed readjusting to align the outlets in the rear bumper... we ended up having to get the gas out and heat up the rear section to try and get a bit more bend in it (but stainless steel is not as malleable as carbon steel). In the end, a tighter rubber hanger did the trick.
As you can hear on a previous posting, the new front section leads to a much more aggressive rumble from emanating out of the back of the car and slightly louder, although not half as loud as I expected it to be. Performance wise, it's hard to tell if there's any benefit since there's something not right with the engine set up at present... but I'm working on that. Once that's sorted, I may be able to better gauge the value of the replacement.
The new fixing bracket should arrive within the next, along with some wheel spacers that I ordered. I return to Jorrit to get these fitted and while I'm there I'm planning on doing a couple more tests... a cylinder leak test and a change of spark plugs and if we get time I'd like to test the mechanical timing.
2 comments:
Great explanation, thanks for the posting!
Exhaust Tip
Great work and explained clearly. Thanks for this I have been working with my exhausts, too.
Post a Comment