Tuesday, July 11, 2006

Strut brace for Ghibli

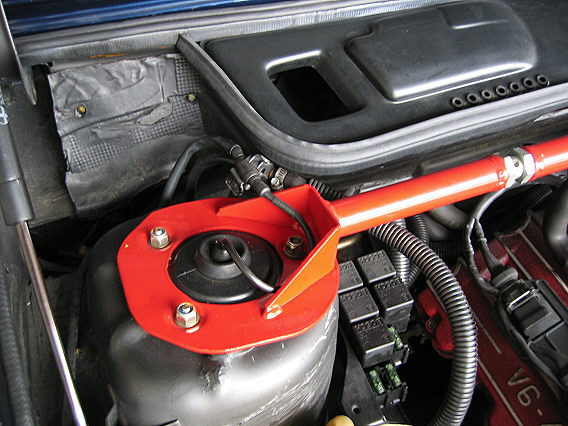
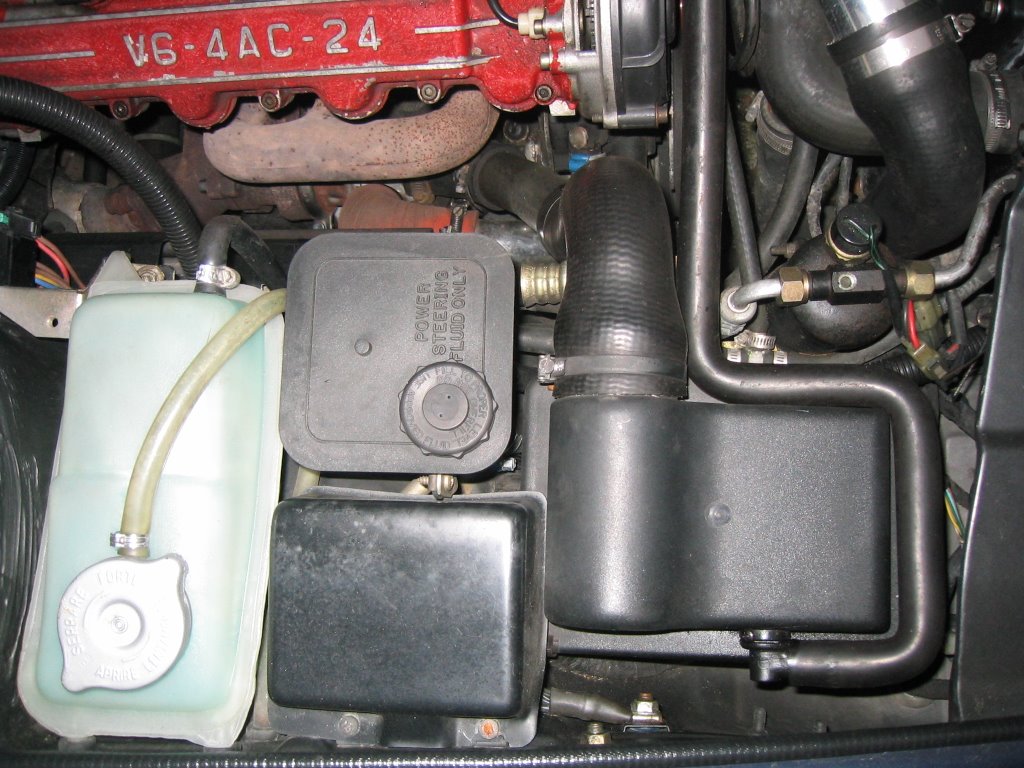
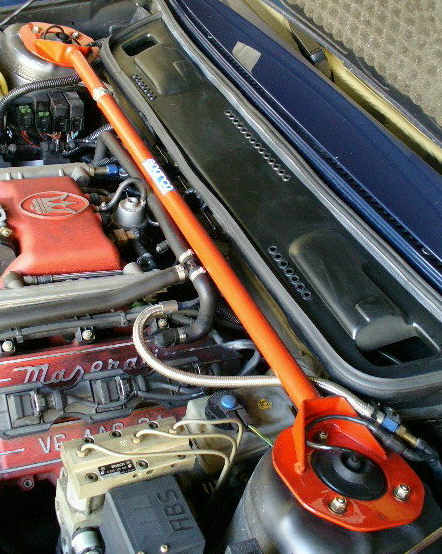
I've been after a front strut brace for my Ghibli for ages. I know that Sparco used to make one, as you can see from the picture below:


I found this picture on a Japanese blog, but since my Japanese is not too hot I couldn't make much of it. I found another picture of the strut brace also on this blog:


It looks like quite a simple design. I was a bit worried about having one made for the Ghibli (I've tried tacking down this Sparco one, but it was discontinued a while back and no one seems to have it in stock... maybe the Japanese bought up the entire stock?), since there are ridges on the top of the strut tower. However, it looks like the Sparco design just sat on top of these ridges? If they did this then I have to assume that it's OK? Here's another picture courtesy of the Maserati Club Holland:


If I do get one made up then it will likely be by the guys at Forge UK. They've already told me that they'd be prepared to make one for me if I sent them the dimensions, so I'll send them these pics and a few from my engine bay and seek their advice.

An alternative was offered to me on Enrico's Maserati pages. A guy in Italy makes some strut braces for Ghibli Cup racers, but these require welding onto the strut towers. I try and keep all my modifications reversible and this one obviously wouldn't be. It would also necessitate sanding down the the strut towers to remove the paint and expose the bare metal and then a paint job once the brace was installed. This is just too much work, so I'm definitely after a bolt on solution.

Another option is the brace offered by MaseratiNet, although I suspect that it's intended for earlier Biturbos and not the Ghibli. To be honest, I'm not too keen on its looks and think it's rather expensive. If I compare this to what I could have made by Forge, I think the Forge ones look much better and I know the quality is good, or at least I've been impressed with stuff that I've ordered off them in the past! Looking at the advertised range of products, I think a modified version of the Cosworth Alloy Strut Brace would be just the ticket for the Ghibli and would go nicely with by Forge Blow Off Valves! The general form and rise of the Cosworth brace seem very similar to the Sparco Ghibli one.


I'm probably not going to order anything yet, since I think it's best to get the car through its big service and overcome the CO emissions problems first, but this one is certainly on the back burner!

Oil vapour recovery system

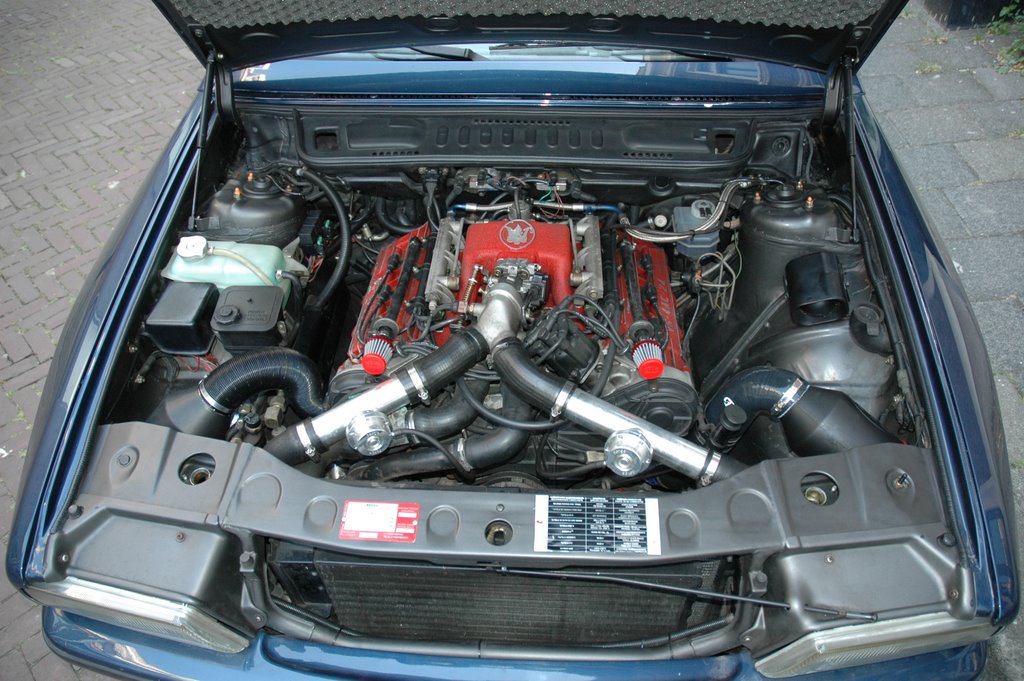
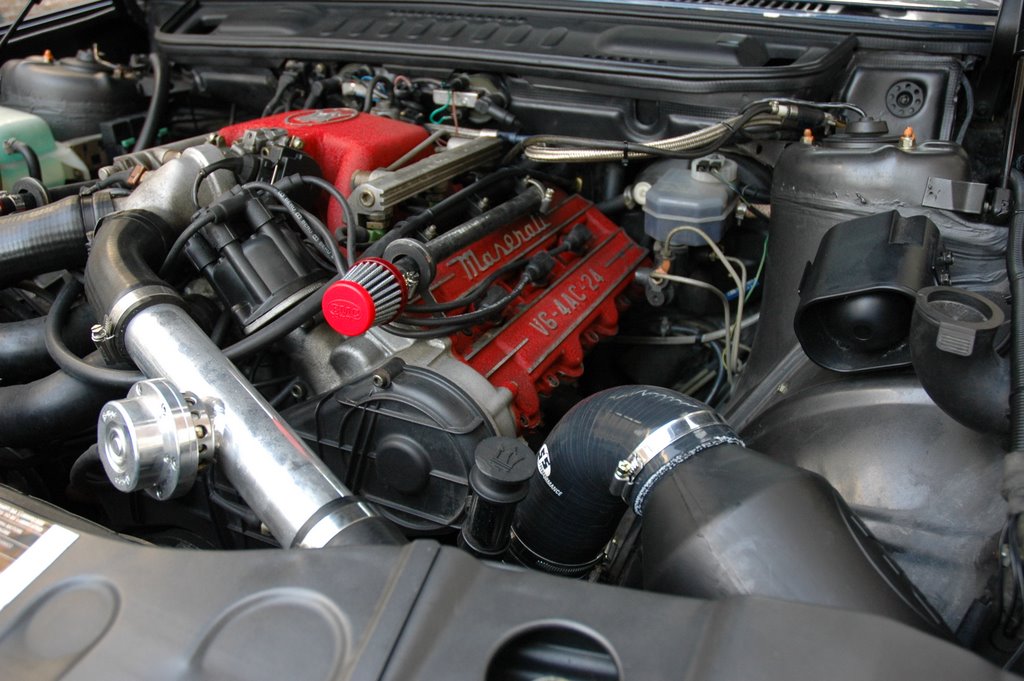
After installing the oil vapour recovery filters (also known as crankcase breather filters) I did a bit of research on the internet, since I was initially concerned at observing "mist" coming from the filters when I opened up the bonnet. You can see the two breather filters in the picture below, the two small cone filters that protude forward from the top of either crankcase cover, attached to black hoses that run to the back of the crankcase cover.


Now that I've disconnected the hose to the inlet system, the fuel and oil is vented to the atmosphere. Not good for the environment since oil particles cause smog (amongst other things). Before, this oil and fuel was sent to the inlet system and burnt in the combustion cycle. Good for the environment, but not so good for the car, since oil reduces the efficiency of the cumbustion cycle, plus the vapour is a bit warm, heating the charge air slightly (this is probably negligible though). I also suspect that the oil from this oil vapour system was falling onto the air filters in the air boxes and clogging them up, since when I opened up the air boxes I noticed a reasonable amount of oil staining on the top (engine side) of the filters. This will have been robbing the engine of some power since it will have reduced the efficieny of the air filters considerably.

After looking on the EurospareS site, it would be possible to retro-fit a PCV (positive crankcase ventilation) system onto my pre-MY94 Ghibli by ordering the parts pictured below (click on picture to enlarge):


This system has an oil knock out tank, which collects the oil vapour and re-cycles it back into the oil system via a conneciton to the sump tank. This means that only warm air with a bit of fuel vapour is sent to the inlet system for combustion and means that oil system is closed loop rather than open loop as I have it and how it was installed on the pre-MY94 Ghiblis.

This is good for the environment, since the unburnt fuel gets burnt and the oil stays in the engine. I'm not convinced that it's good for the car though, since the oil that collects in the knock out tank is undoubtedly contaminated and will degrade the quality of the oil in the engine. This means that regular oil changes are very important! On the old system, the oil vapour simply gets burnt and the volume of oil in the engine decreases. This means that checking the oil level on the pre-MY94 cars is more critical than on the MY94 cars (mental note to check the oil level more frequently on my car!).

If I put my environmentalist hat on, I'd go for the option that was already installed on my car, with the oil and fuel vapour being burnt in the engine. With my tuning enthusiasts hat on, I prefer the option as it is now, venting straight to atmosphere (I like the smell). I think the solution that is installed on the MY94 cars is driven by anti-smog legislation. I think it's only environmentally sound if the used oil is recycled or disposed of in a controlled manner that is environmentally sound, but as a driver I can't gaurantee this, since it's the responsibility of the garage who does the maintenance work or of the disposal company where I drop the used oil off at after making the oil change myself.

Since I don't drive my Ghibli frequently, I don't think I'm a big contributor to environmental damage with this car. If I used the car daily then I'd probably retrofit the PCV system. But for occassional driving, I'd rather know that the oil quality is good and that there's the highest quality mixture going through the cylinders. So for now I'll stick to the newly modified system.

Rica appointment re-scheduled

I'm finding it difficult to keep up! I spoke with Jorrit at Auto Forza yesterday and he informed me that he wouldn't get time to service my car until after his holidays, but that he'd do my car as soon as he got back (the upside is that at least he'll be well rested and enthusiastic when he does my service!).

I've therefore taken the opportunity to bring forward my visit to Rica and the dyno... now planned for Monday 17th July. Looking forward to it...

E-boost 2 road setup

I decided to reset my E-boost 2 yesterday evening, spurred on by the guy at the garage's comments to take the car for a long hard drive.

There's a decent stretch of quiet dual carriage-way not far from where I live (the motorway quite literally stops dead after the council ran out of money while constructing it) which is great for testing out the Ghibli. If you go at the right time there's practically no one there!

I started by returning the sensitivity of the controller back to default. What I noticed now was that the boost pressure was now "wobbling" at the set pressure, which was a little odd.

I then reduced the gate pressure (the pressure at which the wastegate starts to bleed off boost pressure) from the current 1.10 bar down to 0.8 bar. I noticed that the boost set pressure dropped, so I had to increase the set pressure value up from 54 to about 60 (these are nominal values... for some reason you can't just dial in the desired set pressure, but have to work on some arbitary scale). This brought the set pressure back up to about 1.19 bar (a bit less than I was running before, but oddly the car felt just as quick).

I then started to increase the gate pressure back up. I got up to about 0.90 bar before it started getting dark (and I had promised the wife that I'd be back at a certain time and I didn't want to worry her!). My impression is that the boost is ramping up far quicker than it was prior to the installation of the new inlet system. The boost needle on the dash is spinning right round to the top of the amber section and just holding full boost for the remainder of the gear. It seems to get to full boost by around 4000rpm, although it's hard to tell while driving at the same time.

There's still scope to improve this a little further, but I want to do this on the dyno where it's a bit safer (I'm not sure that the police would be too happy if they caught me doing twice the limit). I'll take the boost pressure up to 1.20 bar and since the pressure's not spiking yet, there's still scope to increase the gate pressure setting to ramp up to full boost a bit quicker. And then there's still the sensitivity to play with!

The connection of the inlet pipe to the driver's side compressor is still a problem, since it worked free again. I'm going to give this a clean and use a new fastener at the weekend and see if this sorts the problem, since the connection on the passenger side looks to be holding fine!

Another slightly worrying thing I discovered is that, when I accellerate hard up to about 180 to 200 km/h and then go really hard on the breaks and dip the clutch, the engine cuts out. This happened twice last night. It starts up again fine. It's a bit odd... It seems that there's a fueling problem? Perhaps too much air going into the engine (due to the speed of the car) and not enough fuel (given the low revs after dipping the clutch)?

Failed CO test

I picked up the Ghibli from the garage yesterday and found that it had not passed the Carbon Monoxide (CO) test.

I suspected it might not since it was pretty close last year too.

My car is categorised as E2, which apparently means that it must not emit more than 0.5% CO at 3000rpm (high idle). The guy who tested the car said it was emitting over 2% CO, over 4 times the legal level. I asked him if he thought it was the catalysts, but he suspected not. He thought the engine was not running smoothly and may just need a good shake down. He asked if I drove the car regularly and when I said no, he seemed to think that taking it for a long hard drive may help.

I suspect that the problem is with the fuel map.


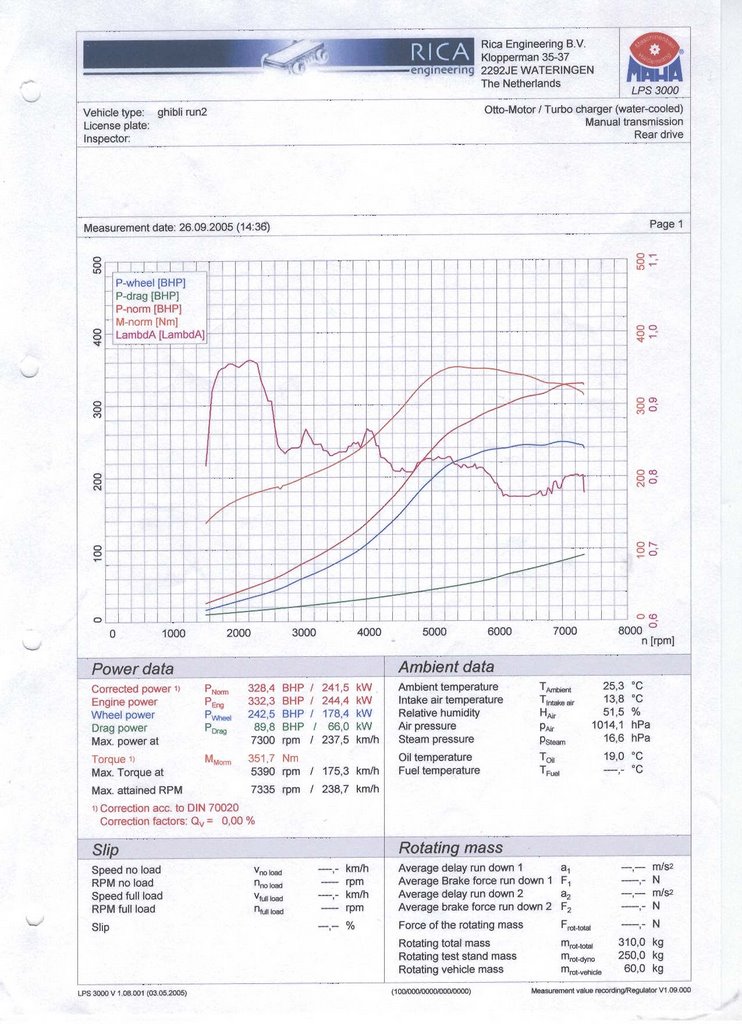
If you look at the last dyno test above from Rica, you can see that at approximately 2600rpm the mixture suddenly becomes rich, with a Lambda value of about 0.84. In order for me to determine if the catalysts are the problem, I need to rule out this rich mixture as being the cause; running a rich mixture means that there's more likelihood of unburnt hydrocarbons leaving the cylinder (i.e. some of the fuel doesn't get burnt since there's not enough air in the mixture).

My intent therefore is to take the car back to Rica and ask them to remap the fuel, paying particular attention below 3500rpm to keep the Lambda value above 0.95.

If the CO is still bad after this, then I'll start to become a bit suspicious of the catalysts. The car is due a big service, so if it's still failing after this then I shall try the test with some known good catalysts and see how it gets on then.

Monday, July 10, 2006

Parts for Maseratis!

I was just reading through the Dutch Maserati Club forum (and my wife thinks I can't read Dutch indeed... seems that I can when it suits me) and came across a link to the EurospareS UK website... and it's fantastic!

I broke the plastic neck to the windscreen washer tank, so I need a new one. I looked it up on the EurospareS site and found it no problems using the parts drawings.


And the best bit is... it only costs GBP 3.00 (about €4.50)! I think I'll be using this website alot!

Rica appointment booked

Seems like the guys at Rica are pretty busy at the moment! I just called to make an appointment for this week, but they're fully booked up until next week. But then my car is in the garage for a big service next week, which means that I can't take the car until the following week! So unfortunately it's going to be 3 weeks before I get to the dyno!

But there's plenty happening in the meantime... today the car is having it's APK (road worthiness test... finger's crossed that it passes, in particular the emmissions test!), the new wheels should be ready for the end of the week (although I'm suspecting that it's going to be the following week) and like I said above, the car's in for its 60k km big service next week!

Saturday, July 08, 2006

BMC DIA installation complete

 
I managed to finally complete the installation of the BMC DIA airboxes to my Ghibli this afternoon. It actually only took me an hour to replace the flexible alluminium piping with silicone hose on the passenger side, which was much quicker than on the driver's side. This was predominantly down to good fortune though, since the straight section of 70mm pipe that I trimmed off the 90 degree elbow turned out to be the exact size needed to attach the bend to the already installed piping.

 
The final installation looks quite nice. I've tightened up the fittings on the driver's side to the compressor inlet and it seems sturdy enough now. Will just have to keep an eye on it to make sure that it doesn't work free. The passenger side connection looks pretty robust though.

 
My only concern now is that, when I opened the bonnet after parking the car in the street, I noticed that there was "steam" coming from the newly fitted oil vapour recovery filters (I say steam , but it was more likely oil vapour?). Thinking it through, this shouldn't be too much of an issue, since if the oil vapour recovery system was as per OEM, then this "steam" would be circulated into the air inlet system and ultimately burnt inside the cylinder. So I suppose the only difference now is environmental... I expect that it's environmentally more sound to burn the vapour in the engine than to let it vent directly to atmosphere?

The car sounds good when driving. I can just about make out the induction noise, but it's quite subtle until I lift off the throttle, when it makes a very distinctive noise, like the engine is exhaling a breathful of air.

I'll try and book a session at Rica next week (to remap the fuel and to get a dyno test done to see the performance improvements), assuming that the car gets through the APK (road worthiness test) OK. Posted by Picasa

Friday, July 07, 2006

Tire supplier

Since I'm not too impressed having to wait so long to get my Bridgestone tires (apparently they were ordered the same time as the wheels, so that's a 9 week lead time!!!) I had a look online and came across Auto Banden Markt.

The prices seem pretty decent and they have an agent in Den Haag, which is pretty convenient. If it wasn't for the fact that I need to check if the wheel/tire combination is going to fit, I'd go and pick up the wheels and buy the tires here.

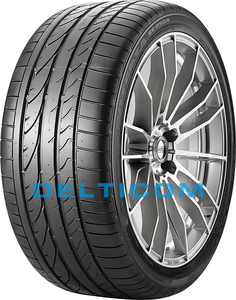
Anyway, here's a picture of the tires that I'm waiting for and here's how the tire performs (seems OK as long as you don't venture out in the snow, which I have no intention of doing!). It's also good to see that there are plenty of manufacturers that supply the new tire sizes that I'll be requiring.

Wheels have arrived!

Just spoke to Korst Banden and they informed me that my wheels have arrived. Unfortunately, they're now waiting for the tires to arrive, since I think the rear tires are a bit of an unusual size.

Hopefully, next week I'll be able to go and get them fitted, assuming everything goes OK with road worthiness test that I have booked for Monday morning.

Fingers crossed...

Wednesday, July 05, 2006

Driving with the Stig

I was just looking through Enrico's pages and came across a story I sent him a few months back, so thought I'd post a link to it.

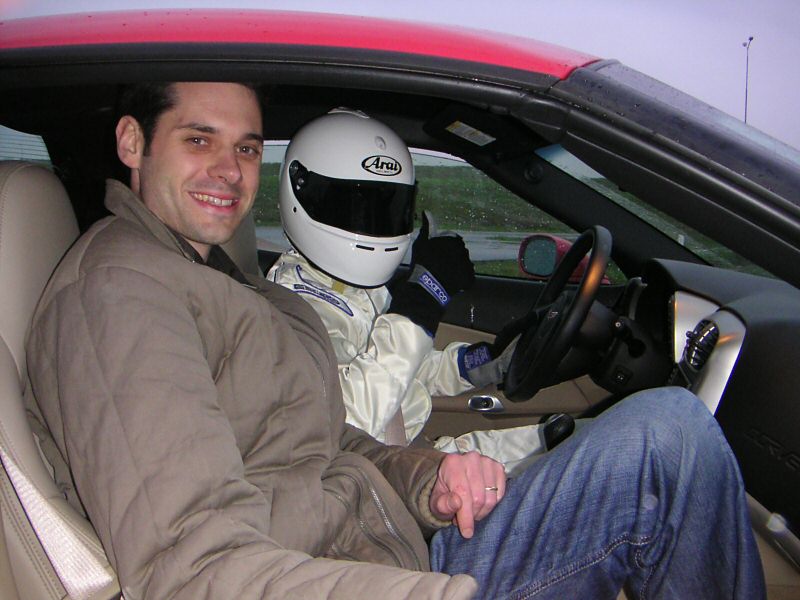
A while back I was fortunate enough to go to a hospitality event at Lelystad, where they have skid pan and track facilities. I was taught how to control the Ghibli in slippery conditions and had lots of time to practice controlling the car in opposite lock on the circular skid track they have there.

But the highlight of the event was being a passenger to BBC Top Gear's famous driver, the Stig. He certainly put my driving skills into perspective!

Tuned Maserati Ghibli Cup

I've read about this car on Enrico's Maserati pages (he's actually got the car for sale here), but stumbled across this page after doing a Google search for Maserati Ghibli.

This guy has spend a small fortune on his Ghibli Cup. Although I don't really share his taste in the cosmetic changes that he's made, his experience with the exhaust and Motec ECU installation is pretty interesting. I'm not convinced that the cost of the Motec ECU is warranted mind you... I agree that the standard ECU system on the Ghibli is rather slow and antiquated, but that's purely on the processing side; the input sensors aren't the problem.

If you take the Ghibli to a decent chip tuning outfit then they will upgrade the existing processor in the OEM ECU. This is what Rica did on mine and straight away there was a noticeable increase in preformance on the dyno of about 10 hp if I recall correctly.

Monday, July 03, 2006

More BMC airbox work

 
This weekend I managed to fit in a couple more hours on the car before watching England get knocked out of the World Cup (disgraceful). As you might be able to make out from the picture above, I didn't quite manage to complete the BMC airbox installation, but did manage to get over half of it done.

 
In the pic above you can see that I've now fitted the oil vapour recovery filters properly! After ordering the right sized filters (13mm ones) and getting some oil/fuel hose (also 13mm), I've located the new filters at the front of the engine block, so that they can receive some reasonably cool air. I think they look cute!

 
I've also replaced the alluminium flexible pipe on the driver's side with some more robust silicone pipe as you can see in the picture above. The only concern that I have is that there's no barb on the connection to the compressor and that it's difficult to get a good connection with the silicone pipe here... I'm really worried that the hose is going to slip off or vibrate itself off. If anyone's got any ideas on how to prevent this (other than clamping it very tightly) then I'd like to hear!

I'll try and get the passenger side changed out next weekend and get some decent pictures of the finished article posted early next week. I also need to sort out that dyno run! And get the car road tested! Busy, busy, busy... Posted by Picasa

Friday, June 30, 2006

Finishing bits arrived for airbox installation

In order to finish the installation of the BMC DIA airbox, I ordered a few extra parts which arrived yesterday... just in time for the weekend!

The original oil vapour recovery air filters I ordered were unfortunately the wrong size, so I had to order a pair of smaller one (13mm ones). I've also ordered some oil resistant 13mm hose for connecting the filters.

On the airbox side, I ordered a 45 degree bend and some straight 70mm hose for the driver's side and some straight 70mm hose for the passenger side to replace the flexible alluminium piping.

I'll try and get it all installed this weekend and post some pictures.

Friday, June 23, 2006

Larini exhaust for Maserati Ghibli


I finally got around to uploading a video clip I took a couple of years back after having the Larini Sports exhaust system fitted to my Ghibli. The quality is not great since I just used my old digital camera, but it gives a good impression.

Should have taken a clip of the before sound really.

Wednesday, June 21, 2006

Rica dyno postponed

The missus had an unexpected visit to the hospital this week, which means that I've had to defer my visit to the dyno probably for a couple of weeks while I focus my attention on getting her fit and well again.

In the meantime, I'll order some new bits of silicone and make the installation of the airboxes a bit more robust. I might also do a rough set up of the E-boost on the road, just to get it running a bit safer with less overboost.

Also, the car is due for an APK (road worthiness test). Jorrit at Auto Forza is fully booked up until next month, so I'll have to get the APK done locally and just hope that nothing needs doing to the car (hopefully it will pass the emissions test OK now that the Lambda probe has been fixed?).

Sunday, June 18, 2006

Maserati Ghibli - Wikipedia, the free encyclopedia

If you're after an official definition of a Maserati Ghibli, check out Wikipedia of course!

Monday, June 12, 2006

Appointment booked with Rica

I've booked an appointment with Rica for the 20th June, so should have dyno results then to post. Would like to have gone sooner but seems they're pretty booked up at the moment.

However, I shouldn't complain since this gives me time to sort out a few other things. I had another look at replacing the alluminium flexible pipe this weekend and think I can do it with an additional few 70mm silicone bits, namely another 45 degree elbow and another straight section to couple up with the 90 degree elbows that I already have. Only problem is that I want them in black, which doesn't seem to be well stocked oddly? Everyone seems to like blue?

I also looked at the fastenings again and have sorted out something far more satisfactory. And I remeasured the oil vapour recovery hose... looks like it's more like 13mm diameter, which means I ordered the wrong size cone filters... oh well!

Was just looking at the IHI turbos website... the turbos fitted to these cars are capable of producing 2.8 bar! That's pretty impressive and perhaps a bit wasted on the Ghibli? I'm looking forward to seeing at what revs I'm getting 1.2 bar at now.

Thursday, June 08, 2006

Maserati Burnout!

I happened to stumble across this video of a Maserati 3200 GT eating up a pair of rear tires which I thought I'd share with you... click on the title above to see the video.

Poor car! I know it's not a Ghibli, but my Ghibli does at least have the same turbos as this car, so there is a connection!

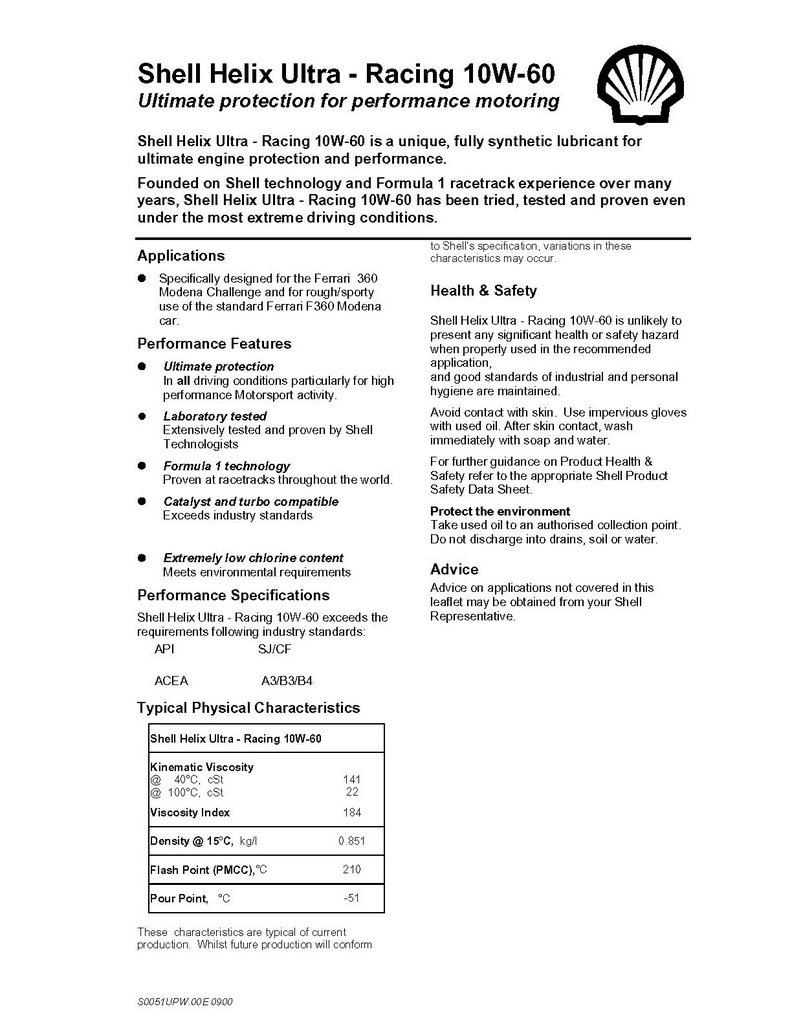
Shell recommended engine oil for Maserati Ghibli

A couple of years back, just after purchasing my Ghibli, I wrote to Shell to ask what engine oil they recommended for my car. Shell offers a technical advice service where they'll recommend which of their products best suits your car if you give them details about your car.

They came back with two options, one using a synthetic oil and the other using conventional oil. Apparently it's not recommended mixing synthetic and conventional oil products, so they suggested that if the car had been running on conventional then to continue with this.

Here's the data sheets outlining the two oils they recommended:


Bear in mind that I have the 2.0 liter MY92 car and that different oil may be recommended for different engines.

Wednesday, June 07, 2006

Turbosmart E-Boost 2 fitted to Maserati Ghibli

A while back I fitted Turbosmart's E-Boost 2 to my Ghibli and have mentioned it a few times in previous posts. At the weekend, after fitting the BMC DIA airboxes, I remembered to take a couple of photographs which I thought I'd post.

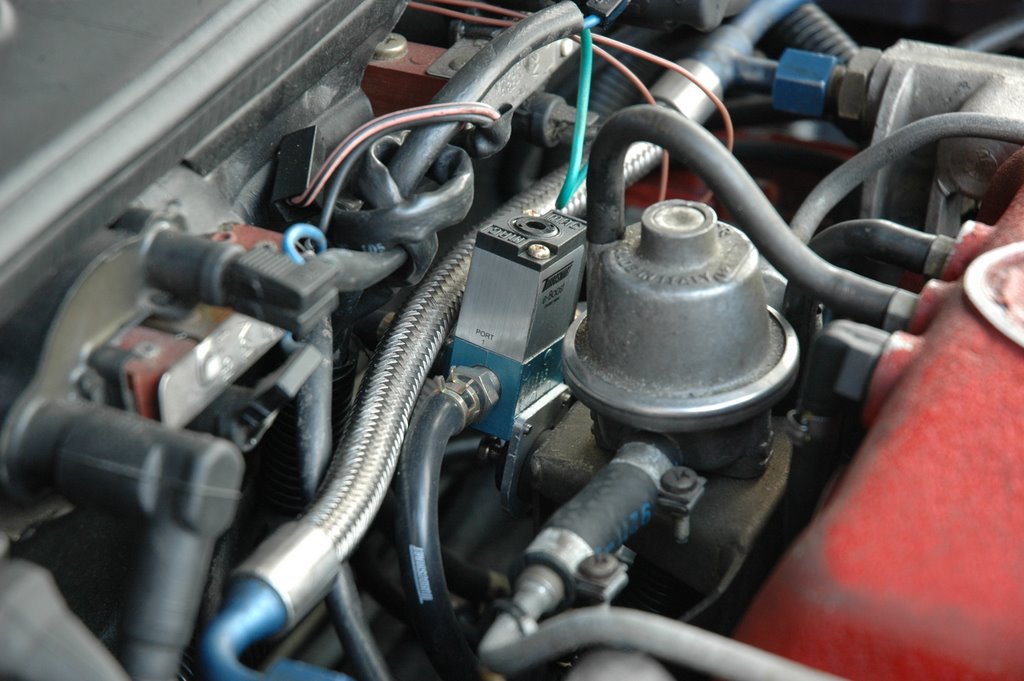
The E-Boost kit comes in two parts, the gauge (which houses all the electronics) and a solenoid, which is the three way valve that physically controls the engine's boost pressure. I intended to locate the guage in the foot well on the passenger side along with the car's engine management system. I assumed that once the system was set up then I wouldn't need to see the guage, but just trust that it's working. This may ultimately be what I do, but in the meantime I just have it located in the glove compartment where it is easily accessible and where I can see it if need be. The guage reads the inlet pressure by T-ing into the hose that feeds air to the pressure guage on the dashboard. I T-eed into this line behind the steering column using the plastic T and silicone hose that came with the kit, and fed the hose round the back of the center console to the glove compartment.

Power for the guage comes from T-ing into the power supply for the radio in the center console, running cable again to the glove compartment and wiring into the loom provided with the kit via the supplied fuse.


A pair of wires was then run from the guage, through the firewall (via an existing wire port) to the solenoid. I located the solenoid in place of the OEM solenoid, which is just behind the plenum chamber on my MY92 Ghibli. The documentation that comes with the kit recommends leaving the existing solenoid in place, since on modern cars there's a feedback signal from the solenoid that enables the car's ECU to determine if the solenoid is working. However, on my Ghibli, it seems that the OEM solenoid is not that sophisticated, since the car runs fine with the OEM solenoid removed.

The solenoid uses the existing wastegate and inlet pressure control hoses and vent hose, so connecting to these is as simple as removing the hoses from the OEM solenoid and connecting them to the appropriate ports of the Turbosmart solenoid valve.

And that's about it for the physical installation. Pretty simple really... but then the electronic control needs seeting up which takes a bit more effort and to be done safely really needs to be carried out on a rolling road. The set up procedure is well documented in the manual so I won't go through it here... but it's quite simple to understand and follow and carrying it out on a rolling road is really easy, since the boost pressure can be set on the fly in real time reading real inlet pressure which is nice. Setting up the controller gain (sensitivity) is a bit more tricky and unless you're comfortable doing this yourself I'd advise getting some help from someone who knows what they're doing.

Before playing with any of the settings, it's very important to set the cut out pressure to prevent overstressing the engine! I think mine's set to about 1.3 or 1.4 bar... if the inlet pressure hits this then the solenoid opens up and quickly bleeds off this pressure, keeping everything safe.

I've got my guage to beep at me when the pressure exceeds 1.2 bar which is quite useful for reminding you to change gear. Can get a bit annoying though... last year I was driving back from Germany rather quickly, so the thing was beeping away continously at me. But for general driving you'll hardly ever hear it. But it is amusing seeing peoples bemused faces in the passenger seat... "what's that beeping?".

You can set the guage up to read the engine's RPM by tapping into one of the distributor wires, but I've not done this.

I got this controller because I was having trouble controlling the inlet pressure with the OEM solenoid and couldn't track down the cause. I had a brand new OEM unit but was only getting fail safe boost of 0.7 bar. I couldn't track down the cause, and ultimately put it down to something strange going on with the ECU. Otherwise, I would have been happy continuing to use the OEM unit, with Rica Chiptuning fiddling with the pressure map on the ECU. However, I'm very happy with the E-Boost since it's easy to use and enables me to fiddle with things without having to rely on a chiptuner. It also enables future projects such as Aquamisting...

Tuesday, June 06, 2006

BMC DIA airbox fitted to Maserati Ghibli

This weekend I fitted the BMC DIA airbox to my Maserati Ghibli (and got sunburn on my lower back in the process... a warning to all car enthusiasts working on their cars outside in the sun!).


I started on the driver's side (I have a left hand drive Italian 2.0 liter model) and removed the OEM airbox and intake system back to the compressor inlet. I reused the existing 45 degree elbow and to this connected a 50 mm hose connector (seems that the existing inlet system is actually a bit smaller than 50 mm diamter since I struggled to get the elbow to fit onto the connector). I then fitted the straight 50 to 70 mm reducer, unfortunately in blue since they were out of stock in black ones at Auto Sport Parts.


The flexible alluminium pipe that came with the BMC DIA kit was then utilised by fixing this to the reducer via a 70 mm hose connector. The flexible pipe was then shaped and trimmed and the BMC DIA airbox fixed onto the end of this. The fitting of the driver's side system went reasonably smooth, since there's a fair bit of room to maneuver on this side. I'm actually not too happy with the flexible allumium pipe, since it feels a bit too delicate and I worry that it might leak... I'm therefore planning on changing it out to a silicon 90 degree elbow (maybe this weekend). I think it's meant to be utilised as a feed pipe to the inlet of the airbox to siphon cold air from the front of the car. In this application, it doesn't really matter if it leaks, but I don't want unfiltered air making it to the compressor (let alone the engine).


To fasten the airbox I used the drilled alluminium strip that came with the kit. I'm not too keen on this stuff and there's not a lot of places in the engine bay to fix it. I used a screw that fastens the filler spout to the windscreen washer tank, but soon wished I hadn't seen the alluminium strip twisted and made a hole in the plastic spout, leaking water into the engine bay. Will have to rectify this at the weekend, but have an idea where I will fasten it... or maybe even make a dedicated fastener.


The procedure for the passenger side was identical except that there's less space here making it a bit more fiddly. This is particularly highlighted by the fact that the inlet hose passes very close to the exhaust manifold on this side... so much so (only a few millimeters clearance) that I'm concerned that the silicone restrictor may not be able to cope with the temperature. So I may need to get a longer 50 mm connector hose (which is not the preferred option, since it lengthens the amount of 50 mm hose which is what I'm trying to minimise) or maybe clad the silicone with allumium foil (not very attractive but probably sufficient to shield the silicone from the heat radiation).

As with the driver's side, I'm not too happy with the alluminium flexible pipe or the fixing bracket, so I plan to improve on these at the weekend.


Another thing that needs sorting this weekend are the oil vapour recovery filters. I've currently installed a make do, temporary solution, but the filters need fitting much better. I plan to get hold of some longer lengths of hose and have the filters located at the front of the engine block, just fore of the O rings that support the OEM oil recovery hoses.

So... the moment you've all been waiting for... how do they perform?

Well, I took it easy for the first 10 to 15 mins to let everything warm up while listening out for any strange noises. Everything seemed to be going OK so I started to open her up a little. First of all, the car feels much more torquey... even in 5th and 6th gears, the car seems a bit more enthusiast between 3000 to 4000 rpm. I can also hear the turbos spooling up with a faint whizz when I floor it at 3000 rpm.

Another nice sound is revealed when I lift off the throttle... there's now a nice throaty intake roar.

Top end performance... well... the car is now breaking traction on dry roads when I floor it in 2nd gear. So that's a good sign. Also, seems that the boost pressure is now spiking. The E-Boost boost controller appears to be venting off boost pressure when accellerating hard, since the car gives a judder and when I try and watch the E-Boost gauge I see it climbing into the mid 1.2s followed by a quick drop to 1.19 bar. This indicates that boost pressure is reaching the safety cut out level, which means it must be spiking. This is good news indeed!

I plan to take the car to Rica Engineering this week to reset the E-Boost controller and check the fuel map. I should be able to set up the E-Boost to ramp up to just over 1.2 bar and then hold it for the remainder of the gear, which should give good, safe, reliable performance. I'll also get a dyno run done and see what's happening in real terms.

I'll keep you posted...

Friday, June 02, 2006

BMC accessories

After having a bit of trouble with my credit card, I ended up sourcing the new hoses that I require to fit the BMC airboxes from a local supplier, Auto Sport Parts in Delft.

I'm planning on fitting it all tomorrow (pending the weather). I just hope it all fits!

Will post some pics this weekend and then try and take the car along to Rica during the week.

Thursday, June 01, 2006

Posting on Enrico's Maserati Pages

Enrico posted a couple of my old emails to him on his website. Click on the link above and then scroll down the page...

Wednesday, May 31, 2006

BMC Airboxes have arrived...

I ordered a pair of BMC DIA airboxes along with a couple of oil vapour recovery filters from Auto Pro Sport in the Netherlands and they arrived today!

Unfortunately, I'm waiting for the some hose fittings from Forge Motorsport in the UK so that I can fit them and since they've only sent them today then I'm probably going to have to wait until next weekend before I can fit them.

Hopefully, good things come to those who wait...

Monday, May 29, 2006

BMC DIA airbox


I took some measurements from the car this weekend. Here's what i need:

  • x2 BMC DIA airboxes with 70mm outlets (I need to confirm that these are 140mm length since there's not a lot of space!).
  • x2 70mm diameter flexible ducting lengths.
  • x2 crossovers from 70mm to 50mm (these need to be stainless steel or aluminium... they're going to be located close to the turbos so need to be able to cope with the heat).
  • x2 15mm filters for the oil vapour recovery system.
  • x2 15mm 90 deg elbows (since the plug in the head cover are 90 deg and i'm not certain that i can pull these and replace them with straight plugs).
  • x1 short length of 15mm silicon hose (to connect the small filters to the plug on the head cover... 100mm of hose should be sufficient, which i'll cut to fit).
  • x2 support brackets (if not included in kit).
  • x4 clamps for 15mm hose.
  • x4 70mm clamps (plus 4 if i require additional 70mm elbows and connectors).

I'll utilise the existing 50mm 45 deg elbow to connect the 70x50mm corssover to the compressor inlet. I need to verify that I'll be able to bend the flexible hose through 90 deg within a length of 110mm, otherwise i'll need a 70mm 90 deg elbow and 70mm stainless steel/aluminium connector between the airbox and the flexible hose.

I'm placing the order with Auto Pro Sport in the Netherlands... I just need to get a quote off them, since I'm working on a budget!

So, it's confirmed that the inlet piping is indeed 50mm diameter, which in my mind is far too small upstream of the compressor. Downstream of the compressor this is acceptable, since the air is compressed and therefore the flowrate here is much less (about half). Moving to 70mm piping upstream of the compressor should give a nice balanced system, with the air velocity equal on both sides of the compressor.

The only way to test this is on the dyno of course... once I've order the parts and fitted them then I'll take the car along to Rica and get it remapped... and of course post the new dyno results.

Saturday, May 27, 2006

Another Maserati Ghibli blog!

I've stumbled on another Maserati Ghibli blog... a Dutchy with a Ghibli GT.

Fantastic... someone else to share some idea with...

Thursday, May 25, 2006

Improved breathing for the Ghibli

I've recently been emailing with a scandinavian Maserati enthusiast who got me thinking about the inlet side of the Ghibli (again).

Having seen my dyno charts and then looking at Modena Performance's torque and power figures for their tunes Ghiblis, it appears that my Ghibli is being restricted on air flow which is capping the performance of the engine. My attentions have been focused on the exhaust side of the engine and problems with the catalyst, but Jarle seems convinced that the problem lies on the inlet side.

So I've been doing a bit of research today, looking at air filters and boxes and stumbled across a new product from BMC that looks interesting. I've always found the air boxes amusingly small on the Ghibli, but this kind of makes sense when you consider there's two of them. I've also always found the fact that there's now decent route for air to flow from the front of the car into the intake system a bit strange on such a high powered car. But to be honest, there's not really an awful lot of space to stick anything exotic in. What's also a bit odd is the dimension of the inlet piping to the turbo compressor. Although it starts off at a pretty healthy looking diamter as it leaves the air box, it appears to rapidly constrict down to a dimater that looks to be in the region of 50 mm? Have a look at the picture below and you'll see what I mean.


From talking with Jarle, he seems pretty adamant that once you start increasing the power output on the Ghibli, the inlet side of the engine (filter, piping and inlet manifold) quickly constrain performance. He might well be on to something... I'll have to do some calculations to determine the pressure drop across the inlet piping from the air box to the compressor, but if you just look at the increase in area going from 50 mm to 70mm diamer, it almost doubles! If you also factor in the increased efficiency of say, a cone type filter versus the OEM filter, it's certainly not going to harm performance increasing the capacity of the intake system.

If you could also get some dynamic charging effect by directing cold air from the front of the car into the intake system, you could improve performance in further, but I've not been able to figure out an easy way of doing this on the Ghibli (although removing the plastic housing around the headlights like this guy has below would certainly help (see page 79 on Enrico's site for more details)).
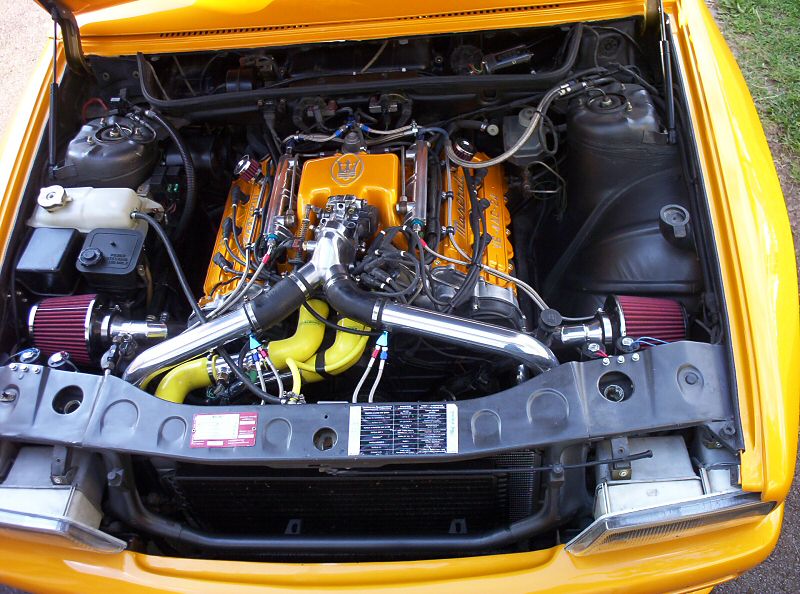

I've always been put off cone filters by the fact that they're prone to suck up hot air from the engine bay when driving at low speeds (which in todays world is most of the time!) which effect both performance and engine longevity. I've therefore been looking for a replacement air box, to shield the air flow from heat as much as possible. I've thought about an itg Maxogen airbox, which in principle is an ideal replacement for the OEM airbox given the orientation of flow in and out of the unit. However, it's a bit too big for the Ghibli and given that you can't easily run a hose from the front of the airbox to the front of the car, it's function is a bit wasted, making the value proposition for this unit (remember you need two of them at about €250 each!) not very positive.

I've also been very tempted by the BMC Carbon Dynamic Airbox. However, as for the itg unit, the value proposition for this unit is not great for the Ghibli by virtue of the fact that it's dificult to route the flexible ducting from the front of the airbox to the front of the car.

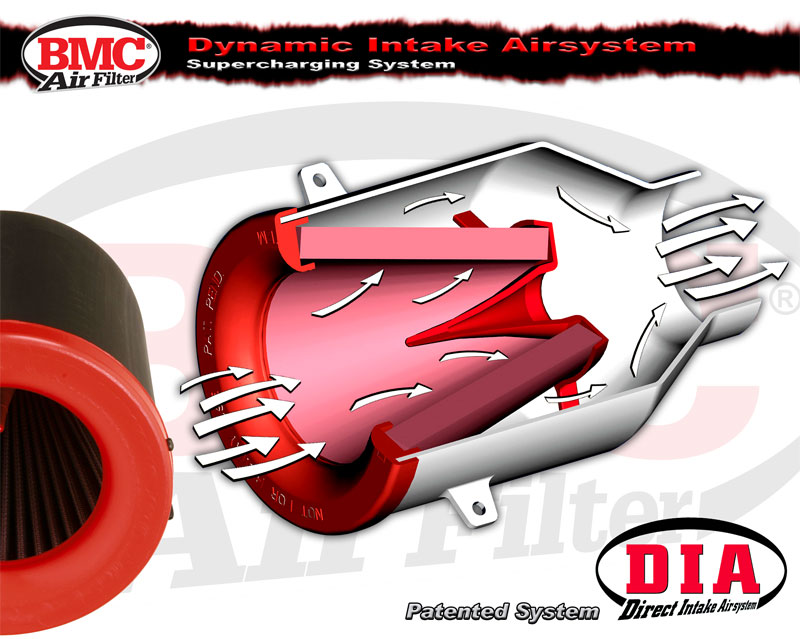
Then I stumbled on the new BMC Dynamic Intake Airsystem, for which I found a nice picture on the Dutch BMC distributors website pictured on the right. This is supposed to be the little brother of the BMC CDA above, made from cheaper materials and hence selling at a cheaper price. But given that it can be run withough the inlet ducting, it could just be perfect for the Ghibli, particularly if the plastic housing around the headlights is removed as in the picture above.

So, time to do some sums. Using Bernoulli's equation (see eFunda for some background), good old Microsoft Excel and a bit of logical thinking, I come up with the following:

My Ghibli has a 2 liter engine and has a rev limit of 7200 rpm. I'll assume the volumetric efficiency of the engine is 90%. The engine inlet pressure is about 1.2 bar and I'll assume that the inlet temperature is about 70 deg C. Air only flows into the engine half the time per revolution of the crankshaft, so to determine the flowrate of 1.2 bar air into the engine, multiply everything together and divide it by two to get 6.48 m3/min or 0.108 m3/sec. This is air at 1.2 bar and 70 deg C, but I'm interested in air flowing through the inlet ducting upstream of the compressor. I'll assume that the air here is at atmospheric pressure and temperature, so 1 atm and 20 deg C. Since PVT = constant, the volume of air on the inlet side of the compressor is about 0.936 m3/sec assuming 90% volumetric efficiency. Since the Ghibli has two inlet conduits, this volume must be halved to give 0.468 m3/sec.

I'm assuming that the inlet piping from the airbox to the compressor inlet on the Ghibli is 5 cm diameter, but I still need to measure and confirm this. If this is the case, then the velocity of the air flowing through the piping is 238 m/sec. Considering that the speed of sound is about 340 m/sec (at which speed all sorts of funny effects start to occur), this seems to be an unneccessarily high velocity for the inlet system? The air flow is undoubtedly turbulent at this rate (this is verified by calculating the Reynold's number). You can get all the air properties also from eFunda.

Next thing is to determine the pressure drop across the inlet piping. To do this requires a bit of Bernoulli. Assuming a friction factor of about 0.02, that the compressor inlet is 30 cm below the airbox and that the length of inlet piping is 50 cm, I calculate that there's about a 0.07 bar pressure drop across the inlet ducting. Dosen't sound like much, but it means that the turbo is having to do work just to suck air into the compressor. If I now calculate the pressure drop for a 7 cm diameter intake pipe, the pressure drop is reduced to about 0.01 bar.

So what does this mean? Well, looks like I'm loosing about 6% flowrate of air due to the choking effect of my current intake piping over increasing the diameter to 7 cm. Since power is directly proportional to the volume of air, this means I could increase the power output of the Ghibli by 6% just by increasing the diameter of the ducting. So that's a 20 hp increase over the current 328 hp, taking it up to just shy of 350 hp.

Looks like I'll be ordering some new stuff pretty soon!
Monday, May 22, 2006

More Rica results...

Enrico asked for some more info on the Rica chip tuning... here's my reply.

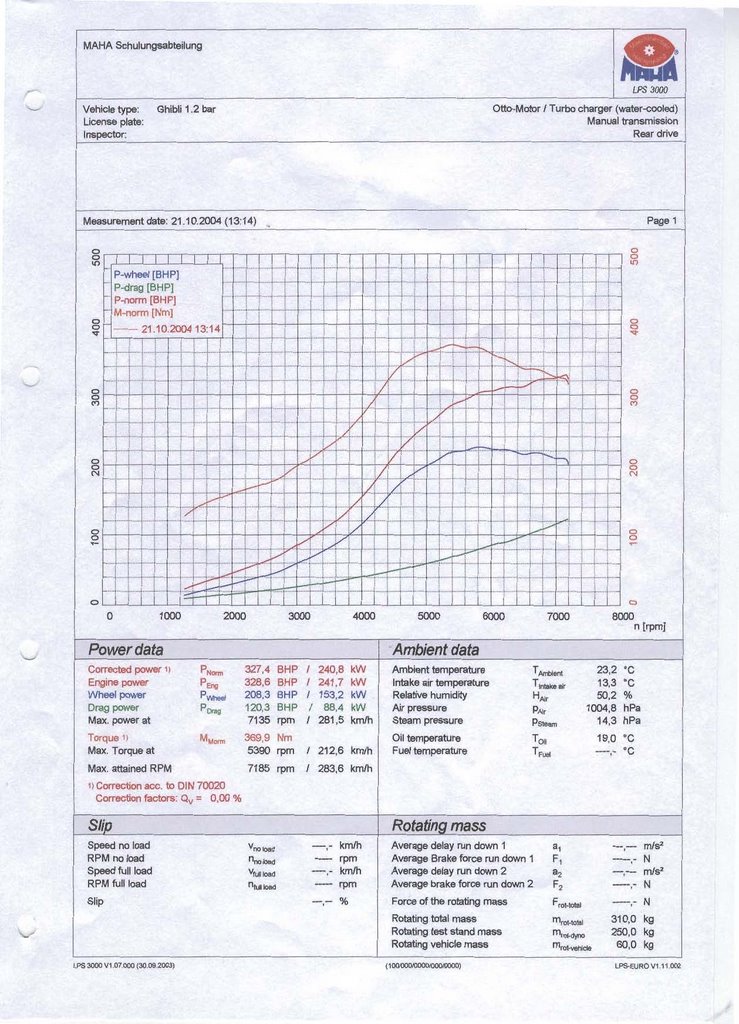
The first page shows before and after changing out the boost controller. After the first visit, the car was under performing due to an OEM boost control solenoid failure. This lead to the curve dated 12.10.2004 and is essentially the power with 0.7 bar.
Once the boost control solenoid was changed out (with a new OEM unit), the curve labelled 21.10.2004 was produced. The second page shows just the 2nd curve.

You'll notice that the torque and power ramp up significantly later than Maserati claim. This could just be my car, but I doubt it since my car is low mileage and everything's been well looked after.


The third page shows dyno results for my post 3200 GT turbos, but I'm positive that it's performing way below what it should be, due to the suspected blocked up catalysts. Hopefully, later this year I'll place an order for a new exhaust front section and finally get to the bottom of this. My reason for suspecting this is, just after I fitted the new turbos I got a dyno test done which showed 306 hp with only 0.7 bar (unfortunately I didn't get a copy of this one). So I know the potential is there for some increased performance with the 3200 GT turbos. At present, I'm getting 328 hp with a little over 1.2 bar and I'm a bit down on torque. Some of this can be explained by the fact that the car is running slightly rich, but I'm positive there's a restriction in the exhaust side.

I'm also currently running a Turbosmart E-Boost 2 electronic boost controller to control the inlet pressure. Another reason why I think there's something odd going on, which again may point to a restriction in the exhaust side, is that I can't get the boost pressure to spike. Despite ramping up the gain on the controller to near full, the boost pressure just won't overshoot the set pressure. I don't believe the turbos are so large that they can't spike the pressure, so I can only think that somewhere there's a restriction.

Anyway, these are just my thoughts. I'd be really interested to hear if anyone else has tried playing with a boost controller and whether they manage to get the boost pressure to spike OK.

Rica chip tuning a Maserati Ghibli

I recently received an email from Enrico regarding my experience with Rica chip tuners. I figured my emailed response might be of interest to others.

I did indeed get my Ghibli chipped with Rica. They reprogrammed the chip rather than installing a new one (although they did upgrade the timing chip since they complained that the standard one was too slow).

I've generally had a good experience with them. They're not the cheapest, but included in the price I get a lifetime of service; every time I change something on the car (like fit a new exhaust for example) then they remap the chip free of charge. I even get a "free" dyno test every time they do something.

They tailored the upgrade specifically for the car... it's not an "off-the-shelf" job. Every time they change something they test it on the dyno and using a lambda sensor they check to see if everything's working to plan.

The first time I took the car to them, they increased the rev limit to about 7200 rpm. The car runs absolutely fine at these revs, with not a hint of the engine being over stressed or unballanced. As a result, the engine output increased from the standard 306 hp to 327 hp. It's always an eye opener taking the car on the dyno, since it invariably shows up how the car is running. When I first took it along, it uncovered that the car was only producing 270 hp. After a short bit of investigating, I found out that the boost controller on the car had stopped working and was running in fail safe mode, only producing about 0.7 bar boost pressure. It wasn't until the boost controller was replaced that the car produced 327 hp with about 1.2 bar inlet pressure.

Bear in mind that I've only had dealings with Rica in Wateringen in the Netherlands. You really depend on the skill of the chip tuner and this of course varies from place to place. The guys where I take my car have had some previous experience with Maseratis and seem to think the electrical system on the Ghibli is rather archaic. Hence the free chip upgrade they gave me.

One thing that I am sceptical about is the recent experience I had with my exhaust. It appears that my car was running for some time in open loop mode due to a faulty lambda sensor connection. It took me a while to track down the problem to this and when I eventually did, I was very suprised that the engine's management system hadn't triggered the "check engine" light on the dash. Anyway, I suspect that running the car rich has plugged up my catalysts. I'm also now a bit weary of installing new catalysts since I don't trust the engine management system to tell me if there's any problems with the fuel mixture. So the only way around this is to fix the engine management system (which isn't going to happen... there's very few people who have the know how to do this), piggy back my own diagnostic system (which is maybe what I'll do, since I plan some future upgrade) or replace the exhaust with straight through pipes and risk running into problems with the police. Anyway, the reason why I say this is because I suspect that rica may have had something to do with the management system not registering the problem with the lambda sensor (although they swear that they don't touch any of the error flagging bits of software, only the fuel and timing maps).

In short... I wouldn't hesitate in taking my car back to Rica, indeed I toyed with the idea of taking my wife's Volvo V50 to them (especially since they offered me a discount for being a loyal customer) but my wife made it quite clear that my car was for playing with, not hers! Indeed, Rica have a contract with the Volvo dealership in the Netherlands... I believe that Rica are responsible for the difference in power between the standard 2.4 model and the 2.4i model... the former is 140 hp and the later is 170 hp and the only difference is the fuel and timing maps. If I'd taken my wife's car to them they would have given me 180 hp (from the car's standard 140 hp) and Volvo would not know the car was chipped. I've actually been at their workshop when a mechanic from Volvo has bought along a customer's car to get it chipped. Incidentally, Volvo charge about a 70% mark up on getting the car chipped directly with Rica!

Aquamisting a Maserati Ghibli

I've been toying with the idea of using water injection on my Ghibli for some time now and thought it was a bout time to collate all the research that I've done to date in order to pull everything that I need together so that I can start on the project.

The idea is to sufficiently cool the charge air going into the engine so that the boost pressure can be safely increased in order to produce more power. The standard pressure at full boost on the Ghibli is about 1.2 bar. I'm currently running a little more than this with the help of the Turbosmart E-Boost 2 electronic boost controller. Using this boost controller, it's possible to increase the boost pressure to as much as 2.75 bar, but this would produce so much heat and pressure that the engine would quickly detonate. However, with sufficient cooling of the charge air, the engine should be able to comfortable operate with 1.4 bar, which would be the target inlet pressure after installing the water injection system.


The water injection system of choice is ERL's Aquamist 2d system pictured above. A schematic of this system is pictured below.


What's missing from this system is a water storage tank; I still don't understand why ERL don't offer a purpose designed water tank for this system, although I understand that it's assumed that the system will be tied into the car's windscreen washer tank, with the low pressure pump that supplies water to the washer nozzle acting as a primer pump for the high pressure water injection pump. There's a couple of reasons why this setup isn't ideal for the Ghibli. The main one is that the battery on the Ghibli is located in the boot of the car. Since the water injection pump draws a fair amount of current, it ideally needs to be located pretty close to the battery, otherwise some pretty thick gauge wire needs to be run from the boot of the car to the engine bay, sufficient to accomodate the required current supply to the high pressure pump. I've had some bad experience running cable between the front and the back of the car... I used to have a VW Corrado G60 a while back and the unscrupulous previous owner had left some wiring exposed in the boot, presumably from a large bass speaker that he'd installed. One day I was driving down the motorway when the car filled up with smoke... the exposed wires had formed a circuit, resulting in the wire insulation burning. Fortunately I managed to pull onto the hard shoulder and sort the problem out, but it's not an experience I'd like to repeat any time soon. I can't think of the second reason off the top of my head, but bottom line is that I'd locate the pump in the boot.

Having determined that I want the pump in the boot, that means sourcing a dedicated water tank to supply the water. Since I want to minimise the amount of hose being routed around that car and I'd prefer a reliable gravity feed between the water tank and the pump (to increase reliability and robustness of the system), the water tank ideally needs to be located in close proximity to the pump. This implies mounting the pump in the boot next to the pump. After searching around for decent water tanks (which is more difficult than it sounds) I've come to the conclusion that a modified version of the Forge fuel tank pictured here would be a suitable solution. This is a 2 gallon tank, which is about 7.6 liters. The Ghibli fuel tank holds about 70 liters (might be 80? can't remember off the top of my head). Therefore, the water tank is about 10% of the fuel volume, which is a good ratio if you're going to be driving with the Aquamist system running all the time since it means worse case you need to fill up the water tank when you fill up the fuel tank. I don't envisage driving this hard though, so the water should last a few fuel top ups.

The location of the ports would need modifying a bit; I'd want some lugs adding to it onto which I can fasten the ERL pump and I'd also want a fitting added so that I could install the low level safety switch pictured here. I'd probably get the Aquamist kit from Turbobits since the guy who runs this online shop owns a Maserati on which he's tinkered with the boost controller and installed a first generation Aquamist system which he's documented on his site here. He also sells lots of ancillary bits and bobs that would be required for the Ghibli install.

Having installed the pump and the tank in the boot of the Ghibli, I'd run a 6mm high pressure hose from the boot to the engine bay, probably running down the passenger side of the interior of the car and through a hole in the firewall. The nice thing about running a long length of hose from the pump to the nozzles is that the hose effectively acts as an anti-surge accumulator, negating the requirement for the item shown on the left; the hose will baloon slightly as the pressure increases inside it... the longer the hose, the greater the balooning volume, so a decent lengthed hose will dampen the pressure spikes of the system. Therefore, to utilise the hose as an anti-surge accumulator, the manifold would need to be located in the engine bay.

Rather than utilise the adjustable pressure switch that is included in the Aquamist 2d kit, I'd utilise the E-Boost to activate the water injection system. The E-Boost can be programmed to activate outputs at user defined pressures and since the boost controller already monitors inlet pressure, there's no point installing an additional potential leak path to the boost system. So the output from the E-Boost would be connected to the Aquamist manifold and set it to crack open at, for example, 1.0 bar.

The nice thing about utilising the E-Boost unit is that it can also be tied into the low level trigger on the water tank. The E-Boost has the facility to operate in three distinct modes. Using it in conjunction with the Aquamist system would require two of these modes to be utilised. The first would be the fail safe mode. The low level switch would be set such that when there's no water in the tank, it returns a zero logic (hence acting as a fail safe in the event that there's loss of power to the Aquamist system). When the E-Boost receives a 0 logic state from the low level switch, it would switch to the default operating mode, running the standard 1.2 bar boost pressure on the assumption that no water is available for injection into the inlet system.

When there's sufficient water in the tank, the low level switch will return a logic state of 1 to the E-Boost. This logic state will switch the E-Boost to water injection mode and enable a boost pressure of 1.4 bar (for example). As an added safety feature, the blocked nozzle detection system of the Aquamist FiA2 controller will control a relay on the low level switch circuit. The relay will be normally open, necessitating that the FiA2 keep it closed under normal operating conditions and hence acting as a fail safe in the event that the Aquamist system looses power. If the FiA2 detects that there's no water flowing through the injection nozzles, then the relay will open and the E-Boost will switch to default mode, operating at 1.2 bar.


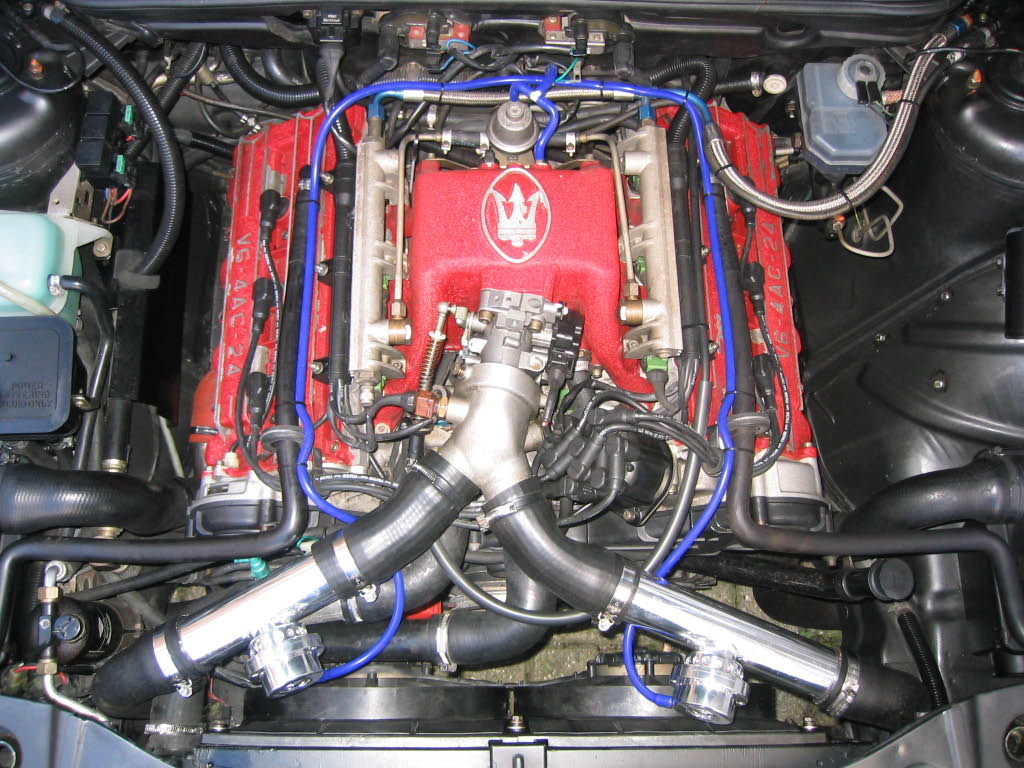
As you can see from the picture above, the Ghibli has two intercoolers and hence two inlet hoses that meet at a Y-piece at the throttle body. To get a good mixture of water and air, but also injecting as close to the plenum chamber as possible, I'd install two injection nozzles, one on each of the inlet "pipes" just upstream from the Y-piece. The shiny tube sections shown in the picture were manufactured to order from Forge motorsport in the UK and have the blow off valves welded directly onto them. I'd send these back to Forge and ask them to weld some additional material onto the tube and then drill and tap it at an appropriate size in order to install the nozzles. I'd locate the nozzles just downstream of the blow off valves in order to prevent water spray from being blow into the engine compartment.

In order to operate two nozzles, I'd require a Y-piece to be installed just downstream of the high speed valve included in the Aquamist kit. I'd want to locate this Y-piece as close as possible to the nozzles and make sure that the hose lengths from the Y-piece to the nozzles were of equal length. I'd also step down the hose size after the Y-piece to 4mm to help maintain the pressure between the manifold and the nozzle. After some communication with ERL via Turbobits, it appears that it's not necessary to run two high speed valves with two nozzles. If one nozzle blocks up, then more flow will pass through the remaining nozzle which should be sufficient to keep the charge cool. If the remaining nozzle then blocks up, the FiA2 module will detect it and send an error signal to the E-Boost to switch to fail safe mode.

So there you have it. That's the theory... just need to put it into practice. Can't see myself having time this year, but probably next year. Maybe Aquamist will have bought out a new system by then though!

Sunday, May 21, 2006

2nd Maserati Ghibli

I was doing some more Maserati Ghibli research tonight and stumbled on a bargain! A Maserati Ghibli for just over €100! Admittedly, it's a bit smaller than what I'm used to at 1/43 scale, but it's an exact replica of my Ghibli.


I'm very tempted to put an offer in!

Monday, May 08, 2006

Wheels on order...

Last week I placed an order for the Compomotive wheels. Seems my deposit is floating somewhere in the ether, since it's listed in my account as being transferred, but the Korst say it's not in there account yet. Hopefully it will arrive there eventually and when it does it will take 6-8 weeks for the wheels to be manufactured and delivered.

The guys at Korst are a bit uncertain as to whether the tires I want will fit, but they're going to have some smaller ones available when they fit the wheels just in case. However, if this happens I might just take the larger tires and have the lip on the wheel arches rolled up. Just have to see once they arrive...

My wife and I are thinking of driving over to the UK later in the summer and doing a bit of a road tour... so that's good incentive to get everything sorted and working properly on the Ghibli in time, otherwise will have to make the journey in the Volvo, which won't be half as much fun! The missus is also talking about getting me a dog... there's no way that I'm sticking a dog on the back seat of the Ghibli, so it might be the Volvo after all.

Would be nice driving the Ghibli in the UK though... I don't believe the Dutch and the UK police forces have joined forces yet, which may mean continued immunity to speed cameras...???